
How to Photograph Wildflowers for Identification
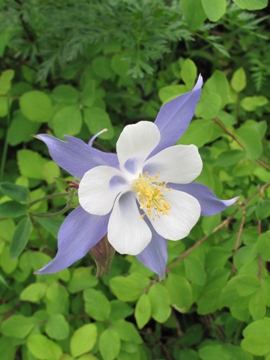
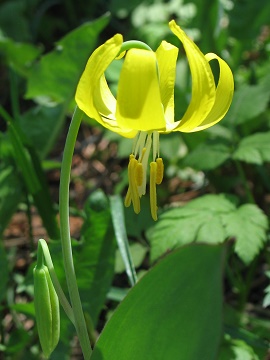
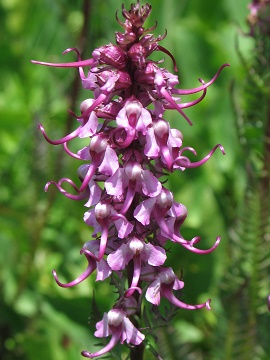
Photographing wildflowers to create a work of art to hang on the wall has quite different demands from taking photos of wildflowers for identification purposes. There are plenty of books and online resources that cover the technicalities of producing art well. This is intended as a guide for taking the photos that will help you to confidently name the flower. Wildflowers are not always identifiable by just their color and form unless they are truly unique, like the Colorado Columbine, Glacier Lily and Little Elephant Heads below.
You do not need an SLR camera and a bag full of lenses to take good wildflower photos but you do need to be familiar with your camera of choice. All of the photographs on this website were taken with a point and shoot camera, see the Photo Gallery for examples of my wildflower portraits. Nowadays smartphones also have very sophisticated camera capabilities. What is most important is to capture the unique features of the plant with a sharp image. Here are a few tips:
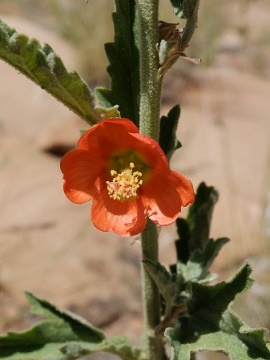
- Take shots from different perspectives. More often than not to accurately identify a flower we have to consider characteristics other than color or a distinctive shape to differentiate it from other look-alike flowers. This means you will probably need to take several views. These photos are typical of what I would take of an unknown (to me) species, in this case the Spear Globemallow. They capture the whole plant, flower and stem detail and leaf detail.
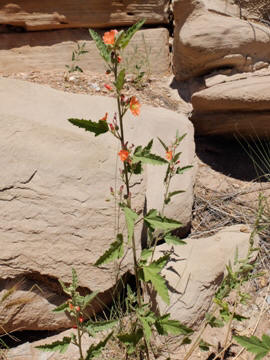
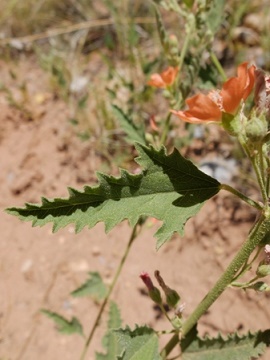
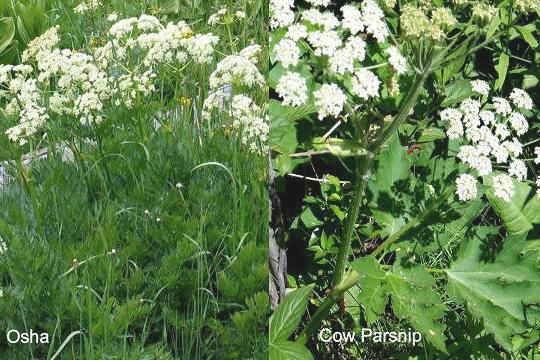
- Include the leaves. Quite often the leaves will be what identifies the flower, particularly in the Sunflower and Parsley families. The Spear Globemallow was identified by its leaves. Another example, the flowers of Osha and Cow Parsnip are very similar. They are both tall, bushy plants growing in the same life-zone but the fern-like leaves of Osha or Lovage differentiate it from the large coarse-leaved Cow Parsnip.
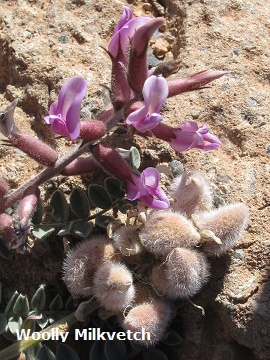
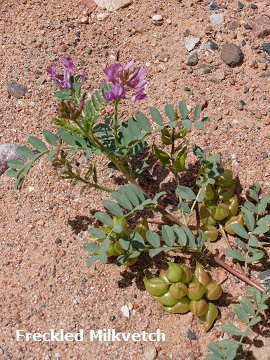
- Photograph seed pods or fruit. Some members of the Pea and Mustard family can only be distinguished by their seed pods. Both the Milkvetch below were growing in the same canyon and are low growing with clusters of pinkish purple flowers. The Woolly Milkvetch on the left has plump hairy pods while the Freckled Milkvetch on the right has shiny smooth pods.
- Note the size of the flower and the plant. This can also help to identify a species. These flowers are both members of the Mustard family, they are both yellow, they both have 4 petals, and they grow in similar habitats in the same life-zones. Not only is the Wallflower taller than the Golden Draba, but the flowers of the Golden Draba are tiny, less than ¼ inch across while the flowers of the Wallflower are much larger, at least ½ inch across.

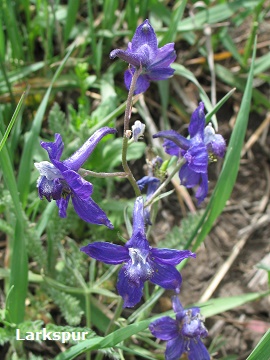
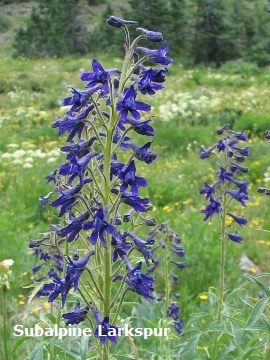
- Note the Date, Location, Habitat and Altitude. These all help to narrow down the possibilities. The Larkspur grows only a foot tall while the Subalpine Larkspur blankets hillsides with plants that can be 6 feet tall. Their flowers are similar in color, size and shape. Another easy way to distinguish these two is the time of the year that you see them in bloom. The Larkspur is an early spring bloomer, the Subalpine Larkspur later in the summer. The Subalpine Larkspur grows only above 10,000 feet in moist, subalpine meadows and woods, the Larkspur only below 10,000 feet in drier, open meadows. Whether the ground is moist or dry, sandy or rocky, sunny or shaded, can be a useful identification tool if it is not obvious from the photo.
-
Use the macro. Most cameras have a macro or close up
mode, often activated by this icon
 . Depending on your camera
or phone you could be as close as an inch away. If the camera does not want
to focus it means you are probably too close so back off a little and try again. You may have to do this
several times until you find the correct distance. It also helps the camera
to focus if there is a contrasting background, green leaves in a grassy
field could be difficult for the camera. You may have to move around the
plant to get a better background. The macro mode allows the camera
to focus at such a short distance from the flower that it
captures hairs on leaves and petals, and pollen on stamens, as in this image of a
Pasque Flower.
. Depending on your camera
or phone you could be as close as an inch away. If the camera does not want
to focus it means you are probably too close so back off a little and try again. You may have to do this
several times until you find the correct distance. It also helps the camera
to focus if there is a contrasting background, green leaves in a grassy
field could be difficult for the camera. You may have to move around the
plant to get a better background. The macro mode allows the camera
to focus at such a short distance from the flower that it
captures hairs on leaves and petals, and pollen on stamens, as in this image of a
Pasque Flower.
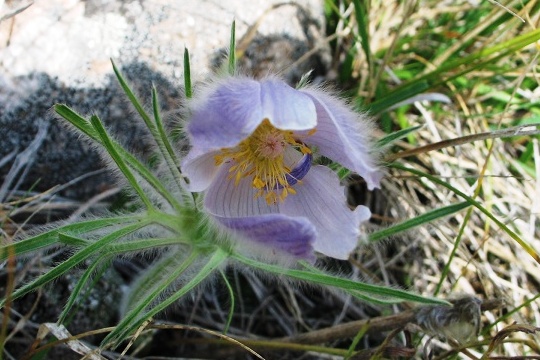
- Get down and dirty. When you look at a wildflower at the macro level you become focused on all the little details of petals and pollen in the camera frame, a whole other world. To do this you may have to be down on your knees and elbows or be lying flat on your stomach in the grass or dirt to get the right angle, as in the image above. To maximize sharpness and to truly represent the plant as it is growing your camera needs to be on the same level as the subject. Shooting down gives no concept of height or shape and may not capture the "face" of the flower, however, it is sometimes important to show the growth habit of the plant for example, if it were sprawling or a mat.
-
Be aware of the light. Turn off your automatic flash.
Look for this icon
 to disable it.
For your camera to capture the best image it needs natural lighting.
When you are up close the flash will create glare and dark shadows, or
wash out the color. The best light is indirect light, like on an
overcast or cloudy day, or the light found early in the morning or
before sunset. Even shade is better than direct overhead light. In
Colorado and New Mexico we have a lot of bright sunny days so if you
cannot find shade, make it with your body, your hat or jacket, or wait for a
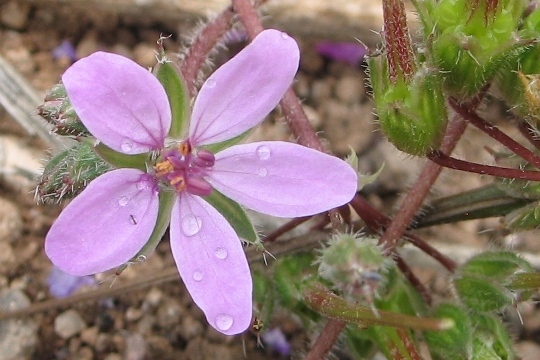
cloud to pass in front of the sun. If you get up early or shoot on a
rainy day you may be able to catch a little morning dew on a
Filaree.
to disable it.
For your camera to capture the best image it needs natural lighting.
When you are up close the flash will create glare and dark shadows, or
wash out the color. The best light is indirect light, like on an
overcast or cloudy day, or the light found early in the morning or
before sunset. Even shade is better than direct overhead light. In
Colorado and New Mexico we have a lot of bright sunny days so if you
cannot find shade, make it with your body, your hat or jacket, or wait for a
cloud to pass in front of the sun. If you get up early or shoot on a
rainy day you may be able to catch a little morning dew on a
Filaree.
- Feel the wind. A real problem of wildflower shooting is the wind. Even a slight breeze will cause delicate blossoms to move just enough to blur them. There are several solutions to this problem which apply to this and the light problems above. First, be patient and wait for a lull in the wind, it will usually come within a minute of two, especially if it is early in the morning or late in the day. Second, shield the plant with a backpack or jacket or human being. If necessary, and it is possible, go back early the next day when it is calm.
- Take a lot of shots. With digital cameras it is not an inconvenience or an expense to take several shots to help increase the chance of a sharp photo. Even on a calm day there is movement in the air which will cause delicate flowers to shimmy.
- Find a good looking specimen. When you get close to a plant you may find it has been chewed on, trodden on or a petal is missing, it is dusty or frost-bitten. Where you find one plant you will usually find another in the vicinity.
Finally...
When you have taken your shots for "science" you can turn around and take the "art" shots; flowers next to a waterfall, interesting rocks, or mountains in the background, include a butterfly or your dog, get a variety of plant species and colors in one frame. Photographing wildflowers allows for a lot of personal creativity.

However short your walk in the quest for wildflowers, don't forget sun protection, rain gear, good footwear, water and sometimes bug-spray. Please don't litter. Please do not pick the flowers, however prolific they appear. All the photographs in this website were taken from the trail, so please stay on the trail. Do not step on the flowers or disturb the soil around them. If you come to a gate, leave it as you found it, and respect 'No Trespassing' signs.
Enjoy!